

How To Change Toilet Seat Cover? Easy Steps for a Quick Upgrade
Is your toilet seat cover old, cracked, or just plain uncomfortable? Changing it might seem tricky, but it’s actually a simple task you can do yourself.
Imagine how refreshing it will feel to have a clean, new seat that looks great and feels comfortable every time you use it. In this guide, you’ll discover easy steps to replace your toilet seat cover quickly and without any hassle.
Keep reading, and you’ll be surprised at how simple it is to give your bathroom a quick upgrade that anyone can handle.

Credit: www.youtube.com
Tools And Materials Needed
Changing a toilet seat cover needs a few simple tools and materials. Having everything ready makes the job faster and easier. Most items are common household tools or cheap to buy. This section lists what you need to complete the task smoothly.
Basic Tools
- Screwdriver – Usually a flathead or Phillips, for removing screws.
- Adjustable wrench – Helps loosen or tighten bolts.
- Pliers – Useful for gripping nuts or bolts tightly.
- Cleaning cloth – To wipe the area before installing the new seat.
Materials Needed
- New toilet seat cover – Make sure it matches your toilet model.
- Replacement screws and bolts – Some seats come with these included.
- Disinfectant spray – To clean the toilet rim before fitting the new seat.
Optional Items
- Lubricant spray – Helps loosen stuck bolts or nuts.
- Gloves – Protect your hands while working.
- Towel or rag – To absorb any water or drips.
Removing The Old Toilet Seat Cover
Removing the old toilet seat cover is the first part of changing it. This task is simple and does not need special tools. Taking off the old seat helps prepare the toilet for the new cover. It also makes sure the new seat fits well and stays clean.
Most toilet seats attach with two bolts at the back. These bolts keep the seat fixed tightly to the toilet bowl. Some bolts have caps that cover them. Removing these caps is the first step to reach the bolts.
Locate And Remove The Bolt Covers
Look at the back of the toilet seat. Find the small covers on each side. Use your fingers or a flat tool to pop these covers open. Set the covers aside to avoid losing them.
Unscrew The Bolts Holding The Seat
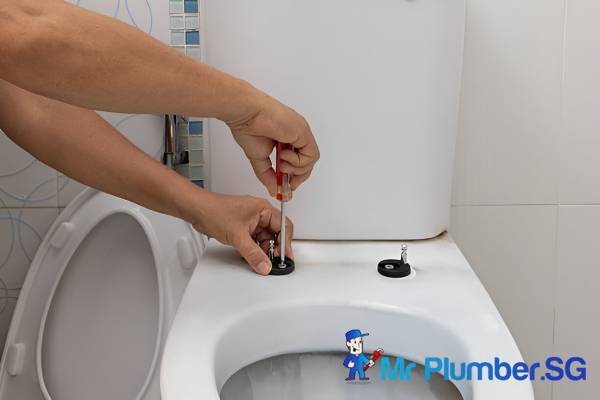
Use a screwdriver or a wrench to turn the bolts counterclockwise. If the bolts are stuck, apply gentle force. Keep turning until the bolts come loose. Hold the nuts under the toilet to stop them from spinning.
Lift And Remove The Old Seat
After loosening the bolts, lift the toilet seat straight up. Remove it carefully to avoid scratching the bowl. Check for any leftover dirt or grime and clean it before installing the new seat.
Check For Rust Or Damage
Inspect the bolts and nuts for rust or damage. Replace any rusty parts for a better fit. Clean the area around the bolt holes to prepare for the new seat.
Installing The New Toilet Seat Cover
Installing the new toilet seat cover is a simple task. It refreshes the bathroom look and improves comfort. The process requires aligning the seat correctly and securing it firmly. This section guides through the installation steps clearly.
Positioning The Toilet Seat
Place the new seat on the toilet bowl. Match the holes on the seat with the toilet’s bolt holes. Ensure the seat sits evenly on the rim. This helps avoid wobbling and ensures comfort.
Inserting And Tightening The Bolts
Insert the bolts through the holes on the seat and toilet. Use the provided nuts to secure from below. Tighten the bolts using a screwdriver or wrench. Avoid overtightening to prevent damage.
Checking Seat Stability
Press down gently on the seat to test stability. Wiggle the seat slightly to check for movement. Tighten bolts more if the seat moves. Proper stability increases safety and comfort.
Adjusting Seat Position
If the seat is misaligned, loosen the bolts slightly. Shift the seat to the correct position. Tighten bolts again to lock the seat in place. Correct alignment improves usability and appearance.
Credit: www.mrplumber.sg

Credit: gorillagrip.com
Frequently Asked Questions
How Do I Remove An Old Toilet Seat Cover?
Locate the bolts under the seat and unscrew them using a screwdriver or wrench.
What Tools Do I Need To Change A Toilet Seat Cover?
You typically need a screwdriver or wrench and a new toilet seat cover.
How Long Does It Take To Replace A Toilet Seat Cover?
It usually takes about 10 to 15 minutes to complete the task.
Can I Install Any Toilet Seat Cover On My Toilet?
Check the shape and size of your toilet before buying a new seat.
How Do I Clean The Area Before Installing A New Seat?
Wipe the toilet rim and bolt holes with a damp cloth and mild cleaner.
Conclusion
Changing a toilet seat cover is quick and simple. Gather your tools and follow the steps carefully. Removing old screws and aligning the new seat correctly saves time. Tighten everything just right to avoid wobbles. A fresh seat improves bathroom comfort and hygiene.
Regular updates keep your bathroom looking clean and neat. You can do this task easily, even without special skills. Give your toilet a new look today.


